Being completely new to Salesforce Email Studio can be a bit overwhelming – there are so many great tools for customizing and sending emails in one place! If you’re hoping to get your feet wet with creating an email, look no further than Email Studio’s Content Builder feature. Content Builder provides a user-friendly interface that can be used for making attractive emails at any level. Today, let’s explore the basics!
Build an Email with Content Builder
To get started, navigate to Email Studio>Email, located in the top navigation bar. This will bring you to your Overview screen, where you can access any of your most recent items without going through your content folders.
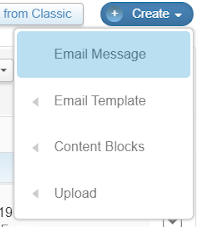
To start building an email, you might have a shortcut in your lower right-hand corner called +Create Email, if not, simply click on the Content tab at the top to access your Content Builder folders. Click +Create in the upper right corner. For the purpose of this article, we will only need to use a premade template; click “Email Message” under the Create dropdown.
When entering the Create An Email Screen, you can choose to create an email using Template, HTML, Text Only, or using an already Existing Email. We will be creating an email using a template. You can start building an email with a template that you or your company has already created, under the “Saved” tab, or you can choose from one of the preset, mobile-friendly templates available in Email Studio. You can change your template selection at any time during the creation process before the email is saved.
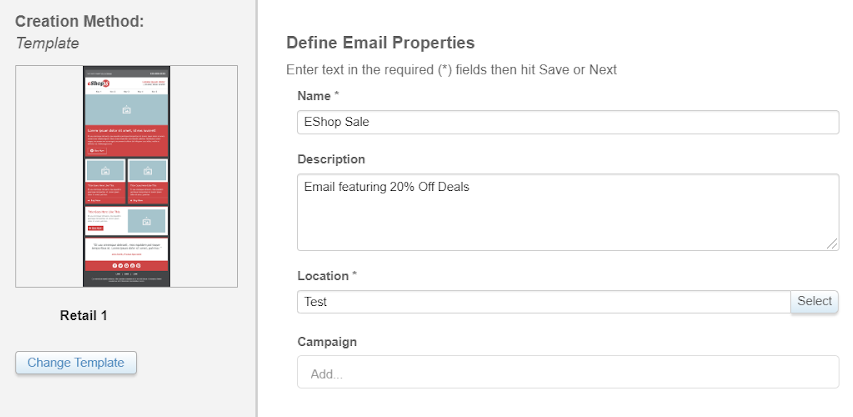
Define email properties
Email Properties is where you can add information to easily identify your new email. Start by naming your email something that is unique and easily located when navigating through Content Builder. Optionally, you can add a Description about your email for more identifiable information.
Location is determined by which folder you would like your email to be kept. A good way to organize this is to keep your email with any other emails included in your campaign. If your email belongs to an existing campaign, you can select it under Campaign, which will supply you with a list of all available campaigns previously created. When finished, click “Next” to go start adding content to your email.
Add Content to your Email
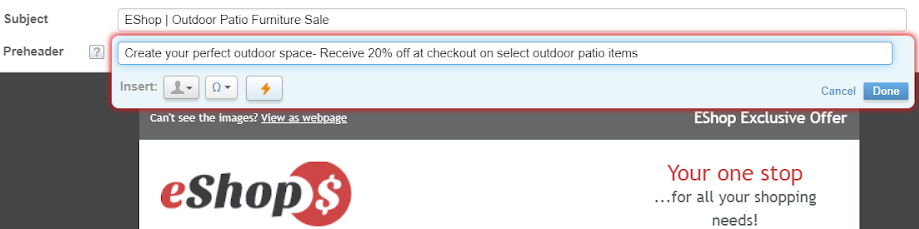
Let’s begin with adding a Subject Line and Preheader to the email. After all, Salesforce will not send an email that does not have a Subject Line, while adding a Preheader helps introduce your recipients to what your email is about, and makes your email more likely to be opened.
Create your Subject Line and Preheader to work together, The Subject Line is just that- the subject of the email! Make sure that is clear, concise, and not misleading. If your email is an advertisement, make sure to give context that is clear to the recipient before opening. Your Preheader should help your Subject Line along by building curiosity, or a call-to-action that will entice the recipient to click and read more. Best practices suggest a preheader should be between 85-100 characters.
Content Blocks are the placeholders you can add to your email. They outline the content type, such as a text layout, image block, or button. You can add a content block by selecting one from the left side of the screen, and dragging and dropping it into place on the email. To edit, duplicate, or delete the content block- click the down arrow that appears when hovering over it.
When your content blocks are placed how you want them, you can move to adding your email content. Click on a Content Block to edit.
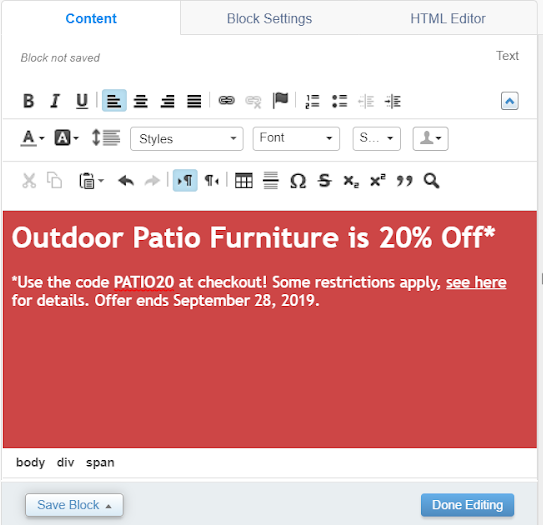
When editing a text layout, you can change what the block says as well as its look and feel in the content text editor on the left. Use Block Settings to change things like the block’s background color, border settings, and increase or reduce the padding or margin on the content block.
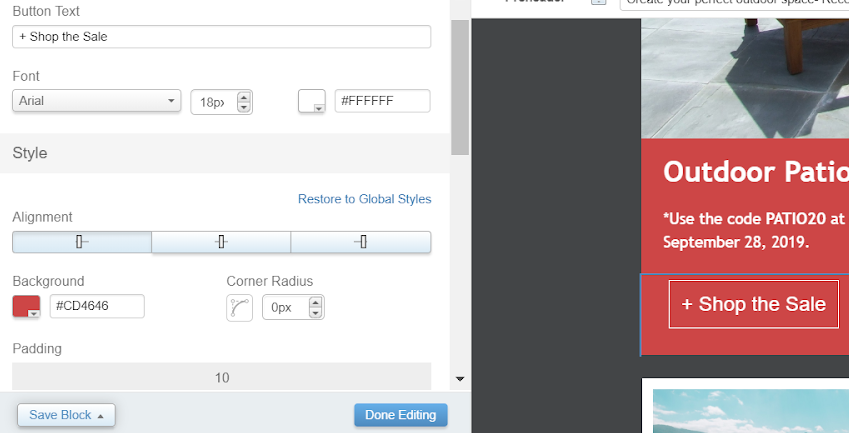
When editing a button, try making the text a clear call-to-action statement to draw interest, and make sure the link destination for the button is taking your customer to the page they expected to see (For instance, if the button says “Shop the Sale,” make the destination a page that only displays products which are on sale, rather than the website’s homepage, this will take some guesswork out of their navigation, and will help you get better results). You can edit the way the button looks, make it rounded, or add padding and margins to customize to your liking in the Content and Block Settings tabs.
To add an image to an image block, click to edit. You will see the option in the left side of your screen to replace the placeholder image, doing so will open Content Builder, where you can choose to navigate to existing images already saved in your content folder, or you can choose to upload a new image right from the popup window.
When adding an existing image, navigate through your folders to find and select the image you want. If you don’t know the pathway to your preferred image, simply type in part of, or all of the image file name. To upload a new image, click +Create>Upload in the upper right corner. This will open your computer’s files, and you can select your image to upload from there.
Once you have your image file selected from Content Builder, you can choose to publish it in your email. From here you can edit the dimensions and alignment, as well as add alternate text and links. Alternate text provides a description for your email recipients who may have settings on their email client that block images from certain senders. Adding a link to your image is just yet another way that a customer can navigate to the intended destination, and adding a title to your image link will create a hovering description for added transparency.
Between using the Content and Block Settings tabs, you can often make attractive and effective email content without having to know any HTML, but the HTML editor is available if you need to go in and fine-tune any aspects of your content.
Finally, every email must contain your company’s physical mailing address, and a clear way for the recipient to unsubscribe from your mailing list to be compliant with the CAN-SPAM Act.
Preview and Test
During the creation process, the preview of the email is constantly updating with the changes you make to it while editing your content blocks. After creating and saving the content for the email, Content Builder allows you to both preview the final product in the preview window, as well as allows you to send yourself a test email to make sure the email is rendering as it should.
To send a test email, enter your recipient- in this case, it’s your own email address!
Choose your preferred From Name, which will be the name that the recipient sees as the sender of the email. Make sure your From Name is recognizable. Often, this will be the name of their brand or business unit.
Next, choose your preferred Send Classification. Commercial emails are for your recipients who have opted-in or subscribed to your emails, and are interested in promotional content or newsletters from your company or brand. Transactional emails are one-time “response” emails to a recipient after they have interacted with your website or app, such as an order or shipping confirmation after the user purchased a product in your online store.
Optionally, you can add a Subject Prefix to your email, which adds text to the beginning of your test email’s Subject Line. This can be a way to sort your emails when testing them, such as by numbering them or by simply marking it as “Test:” as a note to the tester. This does not change the actual Subject Line you have created for your email.
In a test scenario, you often don’t want any of the send information to be used alongside your real data, so make sure you suppress the send from reports, and click Send Test. A summary will pop up and allow you to review your information before agreeing to send.
Tip: You can also use an email testing application like Litmus to make sure that your email renders correctly with all email clients. Your Litmus account can now be integrated directly into your Salesforce Preview and Test Section.
Content Detective
You can access the Content Detective feature by selecting your email in Content Builder, and clicking the down arrow, selecting “Content Detective.” Content detective will do a scan of the content you have included in your email, and will alert you if there are any problems in the email’s content that might cause issues with its deliverability when sending. You can still choose to send without making changes, but often it’s best to remove any phrases that may activate spam filters.
Once you’ve gone through any necessary troubleshooting or adjustments to your email, your email is finished and ready to be set up to send to a real audience!
More Resources:
Email Studio & Content Builder – Organize Your Content
Email Studio and Content Builder Overview